Tuesday, May 29, 2007

Shingles - From Roofs To Walls

... and never had done either before, but you gotta learn somehow. The dining room wall is really taking shape now. I have learned one thing already - buy Pre-Primered cedar shingles! Boy how tedious that is and I only did 1/4 square. I did find rolling was a bit faster than brushing, but not much. Doing this now on all sides should help insure a long lasting paint bond since they will be sealed on all surfaces.


the neighbors were quite amused


After that was done, then they were ready to hang. The starters were already done so I started straight with the first coarse on up. The minimum distance between the edges of overlapping shingles needs to be at least an 1 1/2 inches. For the majority of this though I was staggered by half a shingle - which were all about 5 inches wide. For the reveal, I noted the old shingles before I tore them off. They were roughly between 6 and 6 1/4 inch - and for the new install I kept them at 6 1/8 inch except for the last two rows that had to be 6 1/2 to meet the top of the window exactly. This row gets tricky since they go from the wall to hanging over the window trim, shedding water over the windows - and this row needs to line up across the walls as well in order to look right. For securing the shingles I'm using 6d - 2 1/2" stainless steel ring-shanked nails. A little pricey, but I shouldn't ever have shingles coming down do to rusting nails.


This is where I got to before I ran out, so I will need to order one more box to finish this and for under the foyer window (only 2 rows there). I painted what was up with the color I decided on to get a better vision of how it will look over a broader area and with the stone work.


Next time..... adventures in hanging used garage doors, without instructions (not even chinese), pictures, diagrams, or a normal garage to install it in - and the ending yet to be written....

Sunday, May 27, 2007

A New Toy

Oh what fun will be had when I get this baby running! It's a JET Planer/Molder that will do up to 13 inch wide material and 6 inch thick. Doesn't look like there's too many years on this and should certainly work for what I need to do. This will turn that big pile of rough sawed red oak that's been drying in the garage for the past year into baseboards, casing, even the dining room window seat.... the possibilities are endless. Next step is getting a set of knives made to match the profile of the original molding.


Another great find on - yep - you know the site!

Friday, May 25, 2007

Knocking Down The "To Do" List

The past week has been spent after work wrapping up some of the misc. projects left undone. First thing was replacing the last column which finally arrived. This went just like the others and now I can sit on the porch worry free of collapsing roofs.


Next project almost done is the side parlor window. The new Pella is installed and the woodwork ready for paint. I have one Pella left to install (kitchen) plus finish restoring the butler stair window and install. I gave the "go ahead" to have the foyer windows made by the guy I bought the garage doors from. I should have them in about a month. A surprise was that his prices included glass and glazing - so they will be pretty much ready to install and he is using the older style "wavy" glass. Also they will be exact copies of the originals based on the pictures I have from the Hall family.


I started working on the garage this week too. First was jacking up the main support beams that support the ridge beam. One was split in the middle all the way through and patched with two scraps. I was able to raise this about 2 - 2 1/2 inches. The front beam was not as bad. Both are now sistered with a 2x8 on each side. Then I cleared out some misc. wood and now it's ready for joists to be added to support plywood for overhead storage. I removed all the old wood and rails from the previous garage door that has long since disappeared down to the stone and beam spanning the entrance. I staged the bottom section and I needed to build 12 inches out from each side of the stone wall to meet the door and also support the track system. I doubled up the 2x4 studs and for the base used pressure treated. That's about as far as I've got so far on the door.

Monday, May 21, 2007

My First Roof

... and I wish it was my last! What should have been just a small tear off and replacement job turned real ugly. The 1 story section that comes off the back was the only roof that was not replaced by the previous owners a few years back. I had some days off and the weather is still cool, so I thought this would be the opportune time to get this out of the way.

The first thing I discovered is that I needed to tear off the bottom few rows of cedar shakes where the roof meets the main house in order to redo the flashing properly - no big deal here. Next came the tear off. There was two layers of shingles on top of the original tin roof. The shingles weren't too bad, but I can't begin to tell you what a PIA getting the metal roof was. Finally when the layers were stripped down to the old sheathing this is what I found.


What was once a porch was sheathed in bead board and water must have leaked under there for a long time in the past cause it was completely rotted. I couldn't tell from the inside when I was insulating because of all the paint disguising the problem. Also the last section of sheathing along the eave was bad (this was already replaced once when they tore out the old roof gutter system. Plus the end boards were shot as well. Besides the sheathing, the tails of more than half of the joists were bad which I already new would need some work.


Murhy showed up.... see the clouds!


I lucked out and ended up having a ready supply of random width planks just the right thickness from crating material I salvaged from work. We ended up cutting all the tails off flush with the house, then moving a 13 inch wide plank from the middle of the roof down to the end leaving about 5 inches overhanging past the wall. I wanted this to be bead board since the underside would be exposed, but this plan would have to be modified in order to maintain strength of the eave. From this starting point, the rest of the roof was able to be patched where needed until finally the roof was pretty solid. It was a race against time and rain, so I didn't get to many shots of this part. By the end of the day I was able to get 30# tar paper rolled out and then plastic over this for the overnight rains that were originally not predicted - go figure!

Next day before any shingling was to be started, the underside of the eave had to be dealt with. I really wanted to keep the exposed look like original with bead board showing on the underside, so a little creativity had to be used to still keep this and also maintain strength of the overhanging roof that had been damaged so bad. Here is a mock up of what I came up with.


template for eave structure

It's a pre primed 1x6 that runs along the back covering up the bays between the joists and the nailed edge of the last clapboard. Next from an original tail that was cut off, I made a template for a fake tail that will be mounted every 24 inches like the originals and secured from the back side of the 1x6. Finally, bead board will be mounted along the top of this and screwed down though the tails. This was made in one 22 foot long piece and had to have a staggered joint in the middle between the 1x6 and bead board section. A scrap was secured to the 1x6 just to hold the joint in place while the assembly up and mounted. The bead board was spliced in the middle of tail and needed no reinforcement. A nailer was also added in the bay where the 1x6 joint would land on the wall.


And here it is in place on the house, secured both to the wall and through the overhanging roof sheathing. In the end it turned out as good as I could hope and you would be fooled that this is a mounted assembly and not part of the rafters and roof construction. And strength wise, well I stood on the edge and it didn't move at all - rock solid. Once the drips are added along the edges, the seams are all covered and the illusion is complete.


can you tell??


Now, finally was time for the shingles. I added the drips and starter coarse along the edge and sides. Then started shingling. This part really wasn't hard and what they say about the architectural shingles having almost no waste really is true - almost none. Once I reached the flashing point I rolled tar paper along the top section of roof and up onto the wall. I've added a temporary piece of flashing while my dad makes up some nice heavy galvanized section at work, since they have a nice wide break there. Once this is installed, a last section of shingles will be cut and glued on top of the flashing, and a starter coarse of cedar shakes will be mounted over the wall section of flashing.This will hopefully suffice until next year when I start the second story siding job.


I think I'll wait next till year to do the roof on the garage!

Saturday, May 19, 2007

Waiting For Shingles (and more discoveries)

I installed the starter courses for the dining room wall. These are low (D) grade white cedar and get overlapped by the first exposed course of higher grade shingles. I ordered some that should be here this week. I will have to prime them first and then install.


Since Thursday I've been working on the back roof project - and like the old saying goes - what you plan on doing and what you find are always two different things. I'm too whooped to go onto it yet, but let's just say three layers of roof and lots of rot to deal with. It looks like there will be a happy ending though thanks to my buddy John lending a needed hand and ideas - it's just about done and really looks good now.


what's under here??

While removing the bottom courses of cedar shingles tonight where the roof meets the main house in order to start flashing the new roof - I uncovered these goodies. It's a John Wanamaker box lid with L. N. Hall and the house address plus a sheet from Philadelphia Public Ledger - Dec. 26, 1917. I suppose Norris must have had to do a patch job on the siding to fix a leak and the box top was from a Christmas present he gave to Lulu that he decided to shove in there with a newspaper for me to find 90 years later.....


Thursday, May 10, 2007

A Little Of This - Little Of That

I've been hitting the house on several fronts right now. I continued the dining room windows getting the side stops in and caulking everything up. When the sun got strong in this side, I would jump to the other and work on stripping the side parlor window. Tonight I was able to finish that, so now it's ready for some sanding, filling and priming. Then the new window can go in. Back on the dining room side I primed all sides of the new bead board for the soffet under the overhang that's above the dining room bowed wall. I laid out the old boards I took down (in pretty bad shape) and used them to trace the curved cut out onto the new ones. This worked pretty well and getting the new soffet ended up not to be much of a challenge. All this needs now is a little caulking and painting when the rest of this wall gets done.


new bead board soffet

This afternoon I helped my buddy John make a lumber run with my truck and frame out a deck at his girlfriends house. This is another foursquare about the same age as the Hall house except brick construction. What's cool about this place is that it's pretty much untouched and has some impressive original woodwork in original finish and leaded glass work.


Also added a few more paint samples for outside. We finally have settled on a color - it's the middle one in the pic. It's called "Field of Pines" - made by Valspar. This will be the body color in flat, then trimmed out in standard semi-gloss white. This should look good with the stonework. The green will also be used to accent the mostly white porch. I'm debating using a dark red just on the window sills to add a little "something", but I might just keep things simple. We'll see.


This should be pretty much it till next week - I work all weekend and then going to Cape May for three days staying at a restored B&B. Cape May is a really neat town, like stepping back in time. Should definitely get a little needed inspiration (and even some relaxing time!)

Sunday, May 6, 2007

Dining Room Wall Con't...

Another full day spent on the outside wall of the dining room and things are starting to take shape. After a morning of applying and sanding filler in the bad spots and nail holes - the afternoon was spent getting a coat of primer on all the woodwork. Next I made up some flashing for where the siding meets the sill piece - the original rusted through pretty bad. Then I covered the siding with tar paper which is now ready for new shakes. I still need to add the side window stops, do all the caulking, touch up a few bad spots with more filler, and then will be ready for paint.


While waiting for the filler to dry, I removed the capping from the windows on the kitchen/parlor side of the house. Looks like this won't be as bad as I thought to strip - pretty well dried out and flaking off like the dining room side. I figured this was the shady side and would be a bit more intact. So hopefully I'll be changing out these windows sooner than I thought.


Saturday, May 5, 2007

Dining Room Windows And Siding - Officially Retired!

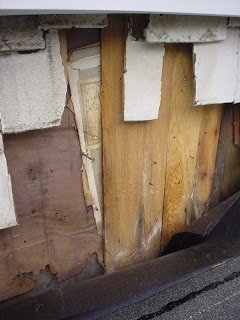
Another busy day at the Hell.... oops I mean Hall House. I set up scaffolding yesterday loaned by the best neighbors ever - thanks again Mike. This morning I finished scraping the wood work around the windows and then tore off the shingles on the dining room wall. Also removed was the soffet wood above - also in bad shape. Underneath looked pretty good, so all I'll need to do is apply new siding, flashing, soffet, etc.


Before you can construct... you must destruct!


With the destruction done, it was time to happily remove the 1970's windows - and none too soon. The left one almost fell apart taking it out. Next was adding the filler pieces up top like the parlor windows and window stop. I couldn't do the sides until the new window was in, because of the design of the sill which inside is higher than part that the window sits on.


Best thing about the old windows was their scrap value


A few hours later I had all three windows shimmed and secured. Next was a quick sanding of the woodwork and applied a hardener to some areas that had degraded and/or split open. Tomorrow the wood will get some filler and another sand, a coat of primer, and the side window stops can be installed. I need to order siding shingles - I finally decided on the HardiShingle since I was happy with their clapboards I used on the back. If I'm satisfied with the first floor installation than I will use them when I do the second/third floors. If not then it will be pre-primed white cedar, which will no doubt be more frequent maintenance than the fiberboard. I know nothing will look exactly like real cedar, but I'm hoping it's close enough. At least it's not vinyl which just isn't right for this type of house.


Nice new windows with our nice "new" antique oak dining table


I finished up setting the tops of the four columns so far installed and caulked both the tops and bottom in place. Now just waiting for the correct fifth one to arrive. Then it will be a quick sand, primer, and paint.

New columns ready for prime and paint

Tuesday, May 1, 2007

Conquering Columns

Well last night and today I managed to install 4 of the 5 new porch columns... and boy what a difference! The old ones look like sticks compared to the new beefy 10in. diameter bad boys in their place now. The scale of the porch just looks "right" now since this size is what was originally used when the house was built.


Lifting to remove first column


First step in the process was starting with the corner column and getting a good height measurement from the cement cap to the header. Once this was found I had to transcribe this to the new column since these are standard 6 ft. high and need to be cut down to roughly 5 ft. for my application. A neat trick I've learned to make a good cutting line is taking a piece of paper (I used tar paper) and wrapping it around the column matching up the edges, trace... instant accurate cut mark. These are fiberglass, so I bought an all purpose blade for my skill saw. Once cut I cleaned up and evened out the edge and was ready to be installed.

First column replaced


A couple 3x4's screwed together and a 20 ton bottle jack on a steel plate did the lifting work. About 1/4in. was all I needed to cut the few finish nails tacking the top in place and removing the old column. Then the new unit was placed, aligned the bottom to the old paint marks from the original (long gone), inserted a piece of pre-cut galvanized flashing over the top cap, and brought the header down on the new column. The cutting ended up being the hardest part!

Pretty bad, eh?!


Once the old column was removed, I could get a good look at the condition of the rotted base - NOT GOOD. It was damaged more than I had thought and glad I'm doing this now rather than finding my porch roof on my porch floor..... no joke, I've seen it happen around the corner from my old house! I hit one corner of the base block with a hammer and it crumbled right off - yikes.

Second column replaced


SO today I did three more and would have done the last, but one was sent wrong. I received a decorative split column made to go around a steel column - that should have been a solid. After talking to Pacific Columns it looks like I'll have a replacement within a week and they said keep the wrong one. It wasn't their fault since these were shipped from a third party....


The "no room for screw-ups" stage


The last one on the corner (the other rotted one) I think is may be at a critical stage. When jacking the next one in series at the steps, this appears to have shifted some weight on the bad column. When I finished I noticed it seems a bit crooked when it wasn't before and the column shaft appears to be sinking into it's own base on one side. I took a pencil and poked it around the side that appeared intact - went right through! I went placed a jack here until the last column gets here..... just in case.


Three done - two to go
(it got too dark to take a pic of four installed)

Monday, April 30, 2007

Actual Real Blog-worthy Progress

For the first time in a few weeks I feel like I'm making some real progress again. Yesterday I finished stripping the other front parlor window opening and primed both. This morning I was ready to remove the two old windows and install the new Pella units. First thing was removing the old units. A couple of screws and they were good as gone since the window stops were already removed from inside and out.

Trim primed and old windows removed

Next I had to add a 1x4 piece to the top since the window was a bit short. It looks like when i gave my dimensions to order, they took them as rough in opening size, but what I gave was what I wanted the window to be. Anywho so I installed the filler which ended up looking fine, then cut and installed the window stops.


Filler piece and stops added to opening - note old weight pulleys visible

Next came time to try out the window for fit, then finally install for real. Once everything was shimmed and plumb and swell, the screws were set through the jambs and the shipping straps cut. I checked the window a few times opening and closing - and satisfied with that, moved on to the next.


Shimming the new window


Both windows are installed and ready for some touch up, caulk, and a final paint on the trim work. I still have one more parlor window on the side, but that needs to be stripped down first. I will probably do the three dining room units next since the paint comes off just looking at them - this is the sunny side.


Two more down - eight to go!

...at least on the first floor

Thursday, April 26, 2007

Another Slow Week

Well another week of lots of work.... but not on the house. I picked up the garage door Sunday and it should work out great. Hopefully I can get to this project early this summer. On a bummer note, the windows I bought for the foyer window seat ended up being advertised wrong and won't fit, so the search once again continues. The guy I bought the garage door from just happened to be a custom window maker - so if a salvaged pair can't be found, I just may have him make them for me. He also gave me a good education on using a moulder/planer and some recommended brands. I'm currently shopping for one to start making the woodwork later this year. I already have all the red oak I need.

I picked up a neat map of Ridley Park from 1909 which shows the Hall house and the rest of the town at that point. I'll get this framed later on and display it somewhere in the house. I also picked up a postcard of the Penn Ave sister house I posted last week - a really awesome find. As soon as I can get the drivers working for my scanner with Microsoft VISTA (did I mention I already hate Vista??!!) I'll post it.


Fun stuff, but sure beats snaking sewer lines

After my 10 hour days at work, I've been able to get an hour or two starting to strip the the front parlor windows outside trim and sills. I wanted to get this done before I install the new windows, especially since I need to modify the stops a bit. So far one is done and I've started the second, it's quite thick and slow going. Also the second coat of mud is almost done in the powder room.


All stripped, ready for primer and a new window


Friday, April 20, 2007

Motherboard Meltdown

As if my plate wasn't already full, the computer decided to crash big time this week. I hoped that it was just the processor, but turned out the motherboard went belly up. In the good old days a few years back I could just grab a motherboard and be back in business, but the computer people have caught up and really have "their" stuff tangled in to the point where you can't swap parts anymore. So a new tower later I'm back online and the posts can continue. There was a time when I would have a few spare computers laying around built from thrown out computers sitting on the curb (which still had plenty of good parts).... the good ol' days.


salvaged window for butler stairs

Not too much to report. The window came for the butler stairs and looks great! Will need a full redo like the main staircase window I just restored. I have one coat of mud done in the powder room. I started scraping a parlor window outside casing/sill to start getting the windows done. I want to do any stripping first before I put the new Pella's in. I got a great deal on a garage door on EBAY and will pick up Sunday - my one day off. It is an all wood roll-up built to look a set of carriage doors, only 2 years old, and complete with opener. These are BIG money and I grabbed for a fraction of new cost. Plus will definitely make the garage look authentic compared to the more modern fiberglass/steal units.


first coat in powder room

Saturday, April 14, 2007

Porch Column Sneak Peak

I finally got a chance to open up and put together one of the new columns from Pacific Columns. It looks like they will work just fine and I managed to measure things right for a change. The quality is as good as I hoped and these suckers are HEAVY - about 80 lbs. a piece. I have all the equipment I need ready, a plan, and all I need to do now is make some flashing pieces to go over the top, which prevents rain water from getting inside them. They also need to be cut down to 5 feet instead of 6, which was the shortest they had available. The taper start about 1/3 up, so you have some room to cut before the diameter start to change.


In other progress, I'm in transition from the dining room to the kitchen/bath mudding. This is usually when I go looking for all the tools I've lost over the past project and finding the floor again under the dirt I've made. With the kitchen and powder room, I had to disassemble the kitchen table, island, hoosier, and stove. I need to get the GE Monitor Top out too, but not sure how yet! I brought it in myself, but had a chain fall over one of the joists above to raise and lower the mechanical part that sits on top of the cabinet (it's about 200 pounds). Unless I make holes through my new drywall job, I don't have this option again..... I'll get back to it later. I also had to remove all the bathroom items too. And where to put all this???? That the bigger question.

Today I finished up some loose ends in the bath - boxing in around the stack that sticks out a hair past the wall and adding corner beads. Tomorrow will hopefully get first coat of mud. I also finally put up a paint sample outside to see if it's what we like - you would think a 50 degree day would not be asking for much in the middle April, but not this year, it's taken almost 2 weeks to get a chance to do it. I like it, not sure if it's what I was going for or not. We'll see what my better half thinks and maybe try one or two others.
Finishing up another 70 hour week at work - phew... and only two more of them to go! Then progress will pick up again around here - and as a bonus, the piggy bank will be full again. But I guess I can't complain with what I've still been able to get done in the little free time left right now.


foyer closet painted - bring on the next project

Thursday, April 12, 2007

Dining Room Colorized

The dining room is finally painted. Continuing in the Arts & Crafts color scheme, this time I used a Glidden color, since the Behr didn't have just the right shade... but I wish they did. The coverage is a far cry from the Behr (which isn't the greatest either) and definitely needs a second coat. I've been one coating everything so far till the woodwork, etc. is finished and then will finish up with a second coat to wrap up the downstairs restoration. I'm happy with the color choice and the drywall work appears to be better than I thought it was going to be once painted. I still need to finish stripping around the windows and the one remaining baseboard. The 4 accent lights will go back (already restored) and I still need to start restoration on the Gas/electric chandelier. Of coarse there's plenty of woodwork to be reproduced in another phase of the downstairs resto, and windows will be done next month.


Tuesday, April 10, 2007

Who Needs 10 Fingers??

I finally was able to finish the sanding in the dining room and the foyer closet this weekend and get them primed. Just to make this more challenging, it appears I broke my finger when snaking out the main drain. The first day I used the machine, I hadn't used one that size before - it's got some fight to it. Wearing rubber gloves, when that snake would start to wind, it would want to grab the glove and get wrapped into it. I had a few close calls, then finally that SOB grabbed on good wrapping the glove completely in till my fingers got jammed. Now to add to the problem, the motor had to come to a complete stop in order to be reversed... so when I grabbed the switch and tried to reverse it, the machine just kept on snaking my hand. Finally shut the machine off, then had to try and untangle the glove and get my hand free. It pinched two fingers pretty good. Well they looked ugly for a few days, but then the bruising went away, but not the swelling on one of them. Things subsided a bit till unloading the new windows I smacked it and disturbed something. By now the swelling hadn't come down in over a week and when moved a certain way - curses fly right out of my mouth! I'm no doctor, but I'd say it's broke. It's not the first time, so I didn't bother sitting at the hospital for 5 hours just to get a splint and a doc telling me to lay off the hand for a few weeks - yea right.... a little thing like a busted finger won't keep me from pushing ahead. Bought a $5 splint and good as new - though cutting-in while painting is not as good, at least now I have an excuse for the wavy lines.

I bought the leaded windows for the foyer and the porch columns came today. I also finished the template for the wrap around window seat in the Dining Room. Next will be painted Dining Room pics.