Saturday, June 30, 2007

Dodging the Sun

The sun and I play a little game throughout the day.... I work in the shade on the driveway side of the house till the sun finds me. Then to the other side that is now shady until once again in the evening the driveway side is shady again. So I've been working between prepping and installing the kitchen window and continuing the foyer window project. The kitchen window was the largest of the new Pella's I ordered and a little more than I wanted to man-handle myself, so I stripped just enough around the opening since I was gonna have some help for a few hours. This time I prepped and added the top filler piece as usual due to the miscommunication in sizing - yet this time the oddball window was dead on what it was supposed to be??! So I had to remove the filler piece and then finally got the window in. It's mounted, caulked and ready for the rest of the outside woodwork to be stripped/primed/painted and that will wrap up the new windows on the first floor.


The foyer window project continues and I FINALLY finished stripping the paint tonight - what a lot of work that was. The next few days I should get the repairs done to the wood and get everything in primer. The tin roof you can see is done with two coats of Tinner's Alkyd Red roof/gutter paint made by Gateway Paints. This is the closest you can find to the old red lead paints used on metal roofs back in the day. I'm happy with the results so far and eagerly await for the windows to be finished so I can pick them up in Cape May and get them installed - what a difference they will make.


I won the jointer on EBAY and should hopefully pick that up this week. Now I have enough tooling to at least start making the main 1x6 pieces for the baseboards.

Tuesday, June 26, 2007

Meet the Beast

My buddy John was kind enough to let me have this 300 pound monster of a saw. It is a DeWalt radial arm saw made around 1945. Believe it or not there seems to be a bit of a demand for this particular saw, and not much comparative in scale or quality available today. It's got a 12" blade and a true 2 HP motor. Everything is fully adjustable and the action and precision is unbelievable for a saw of this age. And this monster will do just about any cut imaginable - it has 24" travel across the arm, arm height is adjustable left/right and up/down, the saw rotates 360 degrees horizontal and tilts 90 degrees down.


After 60 years of service it needed a good cleanup/restoration and it appears to be almost good as new again. My dad welded up a stand for me to make this beast a bit more mobile (yes, this was supposedly their "portable" model!), and I constructed a new surface table/guide based on the original book John gave me with the saw. Now I just need a new blade and get the table "trued" up to the blade and I'll be ready for some serious cutting. One last key tool needed for my trim/woodwork resto shop is a jointer. John has a 4" I can use but I have my eye on a 6" I may lock in this week. Of course I may still use his for smaller work....


Monday, June 25, 2007

Getting Ready For Foyer Windows

Hopefully in a few more weeks I should have the foyer windows that are being custom made from original pics of the house. He's been held up a bit finishing up a Showcase House project in Cape May. In the meantime I removed the other aluminum double hung window and started the fun filled project of stripping paint. I'm about half way done at this point. There will be some damage to deal with and then everything will get painted up and ready for the window install. The roof I decided to deal with as well while I was working in this area. There was a layer of asphalt shingles nailed to the old tin roof that were probably done in 1971 during the apartment conversion (destruction) - and these were shot. The roof was in surprisingly good shape and all I really needed to do was fill the nail holes and some separations from the wall, then do a thorough scrape job. I finished up with a good coat of Rustoleum primer and today ordered some tinner's red oxide paint... this is the red paint you see on old metal roofs and evidence of it was on this roof. Apparently once very easy to get in your local hardware store, it now took some serious googling to find a supplier - and not have to buy in mass quantity. I only need half a quart at best.


Wednesday, June 20, 2007

Back Stairs Window Finished

I finally completed the restoration and installation of the salvaged stained glass window in the back staircase. The PO's removed the original window at some point and replaced it with glass block - not really appealing. This window definitely makes a huge difference both inside and out in what before was an eyesore and now a nice focal point. All that's left i s final paint and the inside stripping the jamb and painting which will get done when I finish restoring the staircase next winter.


Sunday, June 17, 2007

Almost A Shop

The garage is finally powered up, even though I ran 125 feet of wire and of course ended up 3 feet short - never fails. I have a 40 amp sub-panel with a lighting circuit, a 20 amp outlet circuit and a 20 amp 220v outlet circuit. I sleeved the wiring in conduit along the stone walls so they should be well protected. I installed 3 cold weather fluorescents which I haven't had a chance to use at night to see if it's going to be enough lighting.


The outside lights are wired through a photocell mounted in the LB cover feeding the main power into the garage and this is working great. These lights are restored cast iron fixtures found on EBAY - amazingly at different times yet they are a prefect match!


The shop is now about ready. Here is the latest addition to the tool collection - a Craftsman scroll saw probably from the 1950's with a 24 inch throat. This sucker really ways a ton. And the winning bid - $15.00... a real deal! I bought this with the sole purpose of cutting out the reproduced dining room window seat, but I'm sure I'll find many other uses.


The butler stairs window is about done too. Finally finished glazing and now just need to prepare the jamb and install. I hope it's the last window I have to glaze cause I just can't master this art. Maybe big square panes are easier, but these little triangle and diamonds are tedious and just don't come out as nice as I would like. But I guess from afar they won't look to bad.

Tuesday, June 12, 2007

The Big Dig

Last few days have been spent digging the path too run electric to the garage. It's about an 80 foot run to the house and includes running under the driveway and a sidewalk - and this was the easiest route! I'm running 8-3 able which will give me 40 amps to the garage (knocked down one notch due to the long distance). The run will be inside 3/4 PVC conduit except for under the driveway. To get across the driveway I dug a shallow hole at one side and about 30 inches down on the other. I drove a 3/4 black iron pipe at as slight a slope as possible with a cap on the end so it would not fill with dirt. A 10 foot pipe just made it across and I ended up at the bottom of my deep hole. For the sidewalk I drove a pipe and was able to pull it back out and run the PVC through the hole made by the pipe, so the only break in the piping will be at the driveway. I end up under the porch where an existing hole was made to run porch outlets. The cable is halfway pulled now and then I'll need to wire up the garage and I'll finally have a real shop to work in, and not the first floor of the house or the yard.


Saturday, June 9, 2007

Shingle Siding Finished

My order of shingles finally came in (1 square this time) and back to the clothesline priming and painting and hanging to dry.... and the neighbors still shake their heads in amusement. I finally was able to finish the dining room and for my first shingle siding job, it came out pretty good, especially for not being just a flat wall. I finished off with a piece of trim at the top and now this wall is ready for final paint.


While I was in the groove, I went and did the 2 rows under the foyer window as well. I left the under course in place this time since they were in OK condition. I just laid some tar paper over top and added the new shingles. Just need to strip the rest of the window, prime, paint, and await the new windows being made - this should really turn out well and be a nice focal point for this side of the house. Only shingles left to replace on the first floor is on the little porch peak and I may do the garage front this year.


Finished

Tuesday, June 5, 2007

The Garage Solution

So how did I get the door from a fancy 500 pound immovable wall to a functioning roll up door?? With just a $2.00 part of course. I ended up buying an eye bolt for each cable that is closed about 320 degrees - just open enough to slip the cable through. These act as a guide for keeping the cable lined up from the bottom attachment point on the bottom panel, up to above the top panel. Then through the eye and a slight change in direction clearing the beam and wrapping around the winding drum. As the cable moves across the drum the eye keeps the cable in place. Granted there is a slight concern for wear over time and a permanent solution is in the works. But I probably could get several years from this solution easily and it proved my idea will work. Long term I would like to make a pin with a wide roller that will keep the cable in line, but will also let the cable drift some (unlike the sheave with a single fixed groove), and will roll so there is no wear between it and the cable.

With this solved came adjusting the springs. These springs have two set screws that you loosen, then insert a 1/2 inch cold rolled steel rod into one of the holes in the winder and crank clockwise, when you can't move anymore, take a second rod, insert in another hole, pull out the other rod and keep going - counting the number of turns as you go on the spring. Of course a few turns in and the spring really starts to fight your arm! I didn't have the factory winders, so I made a pair out of 18inch long rebar and grounded the ends down till they inserted snug into the winders - worked really well. Now the chart I downloaded from Coplay (marked on the track) said a 7 foot door should be about 7 1/2 turns. The setup they showed only had two springs, mine has four - but I figured it would get me in the ballpark.


Framing complete

So 6 1/2 turns on the outside springs, I then started on the inboards.... on the 5th turn the door started to raise itself! Guess the charts wrong - imagine that, so backed down to 4 turns on each inboard spring and the door stayed shut. I pulled the door up with no real effort and actually had to slow it down near the end of the run. But then... I couldn't pull it back down! There was still to much tension on the springs, so with the help of my neighbor we got it back down. I took 2 turns off the outside springs and tried again - PERFECT! One arm up, one arm down, cables stayed in place.


Door goes up

Now all to be done was build a filler for between the top of the door and the header and trim everything out. Here are the final results. Now all I need is a little power and I can start thinking about reproducing some woodwork.


Door goes down - ready for paint and power

Sunday, June 3, 2007

A Garage Story

Since first moving in, I've been really wanting to put a door on the garage. I really couldn't set up shop until then or risk having anything of value stolen - easy pickins. Well finally about a month ago I picked up a nice solid wood door that looks like carriage doors but is a roll up. It came complete with torsion springs and Genie lift - all I had to do was make it work.

The garage was designed originally for carriage doors and is solid 12 inches of stone. The opening is 17 feet and the door is 15 - so first I had to add 12 inches of wall to each side (this pic is on the previous post). The beam spanning the opening is an I-beam boxed in with wood. I ended up anchoring these walls to the top beam and drove steel rods through the base and about 18 inches into the ground. Later I will be adding some L-brackets to anchor into the floor and up onto the vertical parts of these filler walls.

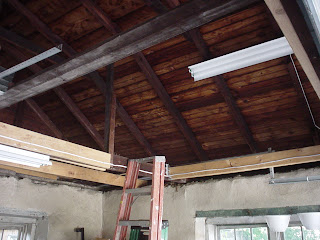
Next with the bottom panel in place I started laying out the tracks and mounting brackets. This is where not having any instructions started to be a PIA! My first go around I had the brackets mounted on wrong face. I new the cable that pulls the door needed a channel to sit in and so I shimmed everything in to create a void.... well after doing this and seeing that the top track wouldn't line up.... take everything down, rip out the 2x6 shims and remount correctly. OK, so now the vertical tracks were right - now for the top tracks. I spanned double 2x6's between the two beams supporting the roof and nailed boards on the bottom so these could float left and right. The ends of the track get attached to these beams and once installed I could square everything up by moving the beams and then lock everything in place.

Torsion springs and tracks mounted

Well, that wasn't to bad - still a few evenings of work. Now to figure out the torsion springs. This is a real monster, 4 springs, two shafts that couple in the middle, brackets between each pair of springs, and end brackets with bearings for the shaft to rotate, plus the winding drum to roll up the cable attached to the bottom of the garage door. I had 8 1/2 inches between the top of the door and the beam, plenty of room to mount underneath - noting to line up the winding drum with the cable channel. So I get this act up and mounted and figure hey - not so bad - then I visualize the door coming up and guess what? It will smack right into the middle of the drum. I forgot to mention that the end brackets are supposed to mount where vertical and horizontal brackets all meet, but I didn't have room because of the beam above. So I mounted it a few inches lower.... now I knew why it had to go exactly where it was designed to mount.


Closeup of mounting bracket - see a problem here??


Great - so now what?? Can't mount under the beam, can't mount on the side of beam because the drums won't line up with the cable channel, don't want to take everything down to square one and remount walls to back edge of beam (later saw that this wasn't possible either!)


Great looking door.... but how do you open it???

Next time - the solutions.