
Wednesday, December 24, 2008
Tuesday, December 23, 2008
Hey - It Looks Like A Bathroom Finally
The floor has dried, the toe moulding is in, and it's time to install everything. The clawfoot tub is in and hooked up....

As well as the pedestal sink....

and here is what I found under all that white paint - tiger oak

The toilet is in with the flush pipe....

All that waits is the parts to rebuild the high tank. I ordered new fill and flush mechanisms, plus refinished the tank.
In process of stripping the door and then I can try out the Porter Cable router hinge template I picked up second hand. I just may get the powder room finished before the end of the year - maybe....

Friday, December 19, 2008
It's A Major Award.....
it just arrived and I know just where to put it!

right in the front room window!

....mind power Swede, mind power.

right in the front room window!

....mind power Swede, mind power.
Thursday, December 18, 2008
Painting Nightmare
It all started out pretty well.....
Once I got the initiative to work on the walls, they went pretty quick and the sanding job came out pretty good for not having done any drywall work in over a year plus. I then caulked the ceiling panels into the crown and the crown into the wall, plus the wainscoting trim. Then it was a good coat of primer on everything. The ceiling was done with Valspar ceiling white.

From there though it was downhill quick. I had already picked out colors for the kitchen, bath, and trim work. After work I stopped by Lowes to pick up the paint, but forgot the trim color. So I quick picked out what I thought was an antique white, got the paint made up and was all ready to go. It was Thursday morning when I got to do the first coat. Wednesday I had to put a new engine in the splitter because it threw a rod - but that's another story! Anywho so I put the first coat on the wainscoting and quickly realized that color was really a tan more than a white - oops. After I finished it grew on me some though and actually would go really good with the kitchen green, but the blue I wasn't so sure. So then came the blue. As soon as I started putting it on I knew it was a bust. More of a Miami beach pool blue than something that belonged in an old house. The "Fiesta" in the name should have given it away.
Friday night I wanted to stop by Lowes and get some new colors so I could start Saturday morning. Well I ended up staying a few hours late so skipped Lowes. When I got home there was still time before we had to go to the Neil Young concert (he can still ROCK!) so I stopped at the Depot around the corner and picked out some new colors. I figured I've had pretty good luck with Behr in the past so what the heck.
Then came Saturday.... I start the wainscoting and quickly notice either Behr got worse or working with Valspar all summer put Behr in a new perspective. It was thinner and much worse with runs. When I would go back to touch up a run it would pull the drying paint pretty bad. I got through that and figured I'd clean up with the second coat. It continued to get worse. Then I go to roll out the blue. Cutting in, I liked the color and seemed OK at first - but then going back to drying sections was the same pulling problem. Just didn't seem like it was biting to the wall. Finally rolling it out, the roller would pull where I cut. After two walls I got really frustrated with the paint, worse than anything I'd ever worked with...... then the runs started. I tried to touch up with the roller and again the paint would want to pull off. All right - I'll let things dry before I go on any further. Fifteen minutes later I come back and the damn paint is literally running down the walls! In a panic I go to wipe a run off the wall before it sets, but it already had skinned over and that just made things worse. A bunch of 4 letter words later I walked away to let thing dry over night with a space heater in the room and stopped by Lowes on the way to work and get my third set of colors, and some high build primer - swearing off Behr paint the whole time.

Sunday morning it took over 3 hours using an orbital sander to clean up two half walls in a 5x8 bathroom. It was a real mess. It was never going to come back to the condition I had it with the first primer coat after freshly sanded walls. The corners I used a little caulk to clean the runs up and along the wainscoting joint. The wainscoting would have to wait, one mess at a time. After the high build prime was on things looked a little better. I got the blue on and finally felt a little better.
The wainscoting had some issues with runs in the joints which I'll never get out, just too time consuming. I sanded the flats some and put the new trim color on. Finally things looked good and the scheme was what we had in mind for the room. I installed the vintage porcelain sconce and new gfi and switches. Then another test fit of the high tank and marked where the medicine cabinet I'm restoring will go. Also mounted a vintage TP holder I picked up.
So today with the painting pretty much finished I did a final sanding of the floors and applied some "golden oak" stain which really brought out the oak floors. A couple coats of poly on the floor and I can finally start moving fixtures back in for good. Things are finally heading in the right direction again......


Wednesday, December 3, 2008
Still Avoiding Sanding
I've been finding every possible job to tackle in the powder room taht doesn't involve sanding the walls - pretty sad for such a small room! But I'm about to the point where I just need to get it over with. The trimwork is all but complete now except for casing which is yet to be made. The caps for the wainscotting is finished, just a simple piece with a bead routered. The sill for the window is in place....same bead detail.

I went ahead and installed the metal crown for the tin ceiling too. To give myself a nailer and added support for these flimsy pieces, I ripped some square stock and installed on the wall and ceiling where the crown sits. This worked out really well.
On the corners, the first piece goes flat and then you have to trace out the profile cut for the other side to meet it. It made up a respectable corner.


Not much else getting done these days on the house while catching up on working my wood pile for the winter - about 2 cords left to split.
Sunday, November 23, 2008
Interior Season Begins
Finally - back to normal work schedule again and I can put the old work belt back on at home. With one minor snow fall already and the wood stove already roaring on a daily basis, my scaffolding season is over and it's time to get back to some inside projects. The plan this winter is to get the powder room and kitchen done so we can finally start living like "normal" people again - you know the one's with kitchen's on the first floor and stuff. The workout from carrying groceries up to the second floor maybe healthy, but it's getting REALLY OLD!
It's probably been a year and a half since I touched this room. Just to recap, the plumbing and wiring are done, beadboard is installed, and tin ceiling is up minus the crown pieces. Drywall is hung with two coats of mud already done. I did build a jamb earlier this year that's waiting for a door to be installed.
I managed to do some prep work during the rare free time I've had recently. The powder room, which I originally planned to do the floor in tile, will now be an oak floor. I have 500 sq. ft. of oak that I removed from the first floor, so I figured heck, that would make a nice floor in the powder the room.... and it's free. So I ran some through the planer lightly just to clean it up. I also started stripping a door for this room which takes a good bit of time.
After laying down some rosin paper, I started laying the floor from the back wall. Once past the pipes it was pretty easy work.

Once I'm done the messy work I'll give it a sanding to blend the boards a bit. Then I may go with a golden oak stain and poly.
Next is trimming out the wainscotting. I'm using a 1x6 base plus capping. The vertical pieces are 1x3 and 1x2's with an overlap - giving 2 inches reveal at the corners. Top piece is a smaller casing molding which eventually will get a cap piece which I'm still contemplating on design. Probably will be a simple piece with the bead edge that's common in the woodwork of the house.


Once this trimwork is done, I need to finish the drywall mudding. I couldn't get myself to sand just yet, so I picked something a little more fun first - even if it's a bit out of order for what I should be doing....
Sunday, November 2, 2008
Didn't Quite Make It
It's that time of year again where I put in 60+ hours a week at work and I fill the piggy bank back up for the up and coming projects.....


And outside work season is pretty much done. It's dark when I get home and getting borderline too cold too paint. Things will return to normal after Thanksgiving and it will then be back to inside work. That will be a nice change of pace since the siding project is starting to get OLD!
I managed to get shakes installed around to the first side window and the soffit installed around the corner. I still haven't installed the weather head on the service yet, but will get that done before winter. The two big front windows were also installed which came out nice and tight - so now all the front windows have been replaced. Two panes shattered while taking one window out but we won't get into that! Fortunately no cuts....
I cleaned out the powder room of fixtures and tub in prep to finish it. I only have one coat of mudding left and the should be ready to start paint and final trim. It's getting close to the point where I'll need to make some new casing to match the original in order to do powder room and kitchen. I think I'm going to set up in the kitchen where its not so cold. Plus I have the suction system now to keep dust under control. I never did this before so I figured I would practice on new pine till I get the hang of it. The I try to tackle some oak for the rest of the downstairs. These two projects should consume most of the winter till spring - then I can FINALLY finish the outside work.
WAY TO GO PHILLIES!!!!!
Tuesday, October 14, 2008
Electric Service Remount
As talked about before, the bracket for my electric drop appeared to have ripped out at some point and reattached - but not to a stud. Tearing off the layers of siding revealed just how poorly attached it was. I removed the siding except what was under the bracket and then started hanging the new siding. Once I was sided up to the next nearest stud towards the front of the house, I was able to make the switch to a new bracket.

old bracket
I pre-drilled and threaded in the new reinforced ceramic bracket. Next I hooked on a new tension clip to the bracket. Then laying the bracket on the guide cable (also the neutral wire for the service drop) I slid in the tapered mating piece. As tension is applied to the bracket, the pulls the taper closer making a tighter grip to the cable. It's a simple and really reliable design. Once the new mounting was complete I was able to remove the old bracket and the siding underneath it. Fair warning though, extreme caution needs to be taken when working around a service. One bad move can leave you a toasty critter and there is no breaker out on the street lines to blow if you do short something out! Usually the wire, the tool, or you will become the failing point to break the circuit if something bad happens.

I still need to put a service weather head on the cable. Right now it just has a "gooseneck" head, where they just bend the cable over to keep water from getting in the cable where the sheathing is cut to expose the individual leads. A weather head has a mounting screw and keeps the top of your cable more secure.
Sunday, October 5, 2008
Running Out Of Time
My work schedule gets crazy again starting Oct 25th, so basically I have till then to get as much done on this side as I can. After that it will be pretty much dark when I get home (and probably won't feel like doing much!). The corner is stripped down and papered, plus the belt trim is stripped - so now I can start to shingle the corner and get the front finished. I started yesterday and have three rows done up to the porch roof along the side. The next level will start wrapping around the front. I have a few batches done so we'll see how far I get today, but the limiting factor on time again will be how fast I can get more batches painted....


I ran into a problem with the service cable. It appears that at some point in the past it was ripped off the house and then remounted about 6 inches away. The problem is they didn't his a stud! As I started prying hoping to work some of the siding out from behind it and be able to leave it in place - the entire bracket started moving - yikes. So I just worked around it for now leaving it everything in place. The sheathing is pretty thick, but with all the material between the bracket and the sheathing I don't think it grabbed to much wood. So my electrician buddy told me a trick to switch the triplex (wires coming from the pole) to a new bracket without having take on the full weight of it. It's a good 100 feet run to the pole, so I doubt I'd be able to hold on very long let alone try to fish onto a new bracket. I get into this more when I actually do it.
Another issue I had to finally deal with was a 1 1/2 inch conduit run that went from the service panel, up the outside wall along the service cable, then down along the belt trim and poke into the house in the from bedroom and the back bedroom/2nd floor kitchen. There were 5 circuits total which had to be disconnected from the main panel and pulled back to where they went back into the house on the second floor. Then I was able to remove all the ugly conduit. Two circuits were dedicated to outlets probably for window AC units, so I just eliminated them. Three others feed the third floor which was semi redone before I bought the house. Two of these seemed to power most of what I'm using up there, so I temporarily made a junction box in the front bedroom and powered these two a new feed I ran to power the front bedrooms. When these rooms are gutted I can run the lines up to the third floor and to the closet where the central AC will be and a sub panel.
Sunday, September 28, 2008
Finally Back
Before leaving for vacation, I was able to finish up the soffit around the corner, add the crown detail, and do final painting. It's tied things together pretty well.


Back from vacation I built scaffolding around the corner so I can make my way around the final side of the house. Once again another colony was nested in the soffit which made for a fun tear down. It's a little more tricky here with the electric service which would not mix well with aluminum siding if I nicked a wire! The old soffit and aluminum tear down is finished, so next will be getting the old shakes down and working the corner with new - if the weather cooperates. I think we brought the English weather back with us.....

Back from vacation I built scaffolding around the corner so I can make my way around the final side of the house. Once again another colony was nested in the soffit which made for a fun tear down. It's a little more tricky here with the electric service which would not mix well with aluminum siding if I nicked a wire! The old soffit and aluminum tear down is finished, so next will be getting the old shakes down and working the corner with new - if the weather cooperates. I think we brought the English weather back with us.....
And just to make you all feel better about your own "not square" homes - check out "The Crooked House of Windsor". The pic doesn't do justice for just how crooked this house was!
Saturday, September 6, 2008
3rd Floor Unveiling
Well..... Here it is! Got the scaffold down just in time for tropical storm Hanna's arrival.


Now it's back to finish up the 2nd floor.
Wednesday, September 3, 2008
Enjoy The View While It Lasts
It won't be long now before I come back down to "safer" heights....


Over the past week I managed to get all the stripping done, repaired the window sill and trim, finished all the shingles and beadboard - basically you can stick a fork in it except for the finish painting. That should be complete tomorrow. The bead board I've been using so far once again worked good in this application. Once I caulked everything in, it tied together great.
Hopefully the scaffolding will be down by the weekend and I can really appreciate the work.
Tuesday, August 26, 2008
More Pics - And More Progress
As promised - a few more detailed pics of work written about in previous post.

The reproduction windows

New crown flares out starter course for 3rd story

New composite bead board sistered over original


Drip edge and crown installed along roof line
Monday, August 25, 2008
3rd Story Progress
This weekend with some help from John I managed to get a good jump on the 3rd floor work. While I started rebuilding the crown that flares out the shingles on this level, John removed the pair of replacement double hung windows and prepped for the installation of the reproduction set. With the crown rebuilt I added the starter course and finished papering the sheathing in prep for the siding.


Next the bead board had to be dealt with in the "inset" area. I decided to go with the same material I've been using to replace the soffit. On the inital vertical sections I just mounted them right over the original since the new pieces are only a 1/4 inch thick. Once it starts the 45 degree angle under the roof I nailed 1x3 boards to use as a nailer and this will let them sit flat since nails are popping through from the asphalt shingles above. The beadboard can't be installed here yet until I strip the front rafters.
Back on the windows, they were made almost dead on perfect and just had to be tweaked because the opening were a little out of square. Once installed and opening freely, the next day John fabricated a new sill to match the originals. This he made from the pine bases I replaced under the radiators on the first floor. Finally stops were added with built in weather stripping. Brass hardware is on backorder at the moment. There is still an issue of making a screen - but I'll get into that later.
Next day I started installing the shingles on the outer section, getting as far as running up the rafters. I was sure to document how the old timers made the transitions, since there was a bit of thought and a few shingle hanging tricks that went into them (using thinner pieces, cutting layers at certain spots, etc).
Today I got the nerve to do the upper peak. I had an eyelet mounted to a piece of angle that my dad made for his roof job, and I was able to mount that to the house just above the double windows. I hooked my lanyard to this from my body harness I have from work - giving me just a little security.... especially up on a step latter on the top section of scaffold! Next step will be rebuilding the trim along the roof line, then the outer section can be finished painted. I'll take some better and more detailed pics this week.
Outer shingles finished
Sunday, August 24, 2008
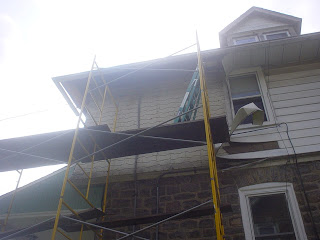
Advanced Scaffold Building


Tuesday with the help of my buddy John, we managed to get the scaffolding built on top of the porch roof to access the 3rd floor front dormer. I played with a few ideas for the base, usually over complicating the matter...... but in the end, the adjustable feet had just enough to make it level. The upper feet I just used wedges. For the lower, I mounted to a 2x6 - which one edge rested on the roof and the other end was propped up with a 2x3. This made for a level base to fasten to. The bottom feet are also supported by 2x4's that run along the roof. I'll take a closeup later and add to this post. It's quite high up there for sure - but still not as bad as the chimney job!


All the woodwork up here has seen better days

Quite a view - about 45 feet from street level!
Subscribe to:
Posts (Atom)