Sunday, July 27, 2008

Side Two Finished

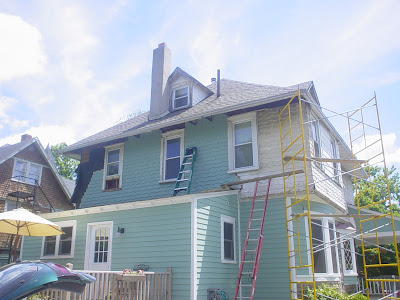
It's been a hot struggle with temps normally in the 90's - but the siding is now up on the second side of the house. Once I was above the roof line, installation was pretty routine. I ended up continuing around to the first window on the front of the house. That pretty much means the front is 1/3 done too.


I still have to do the soffit which needs some supports installed first and some rot damage repaired on the rafter tails. Then it will be a final paint on everything and I can finally wipe my hands of this side. I really need to take down the scaffolding soon so I can finish the landscaping....


Which lead me to the other project I've been dabbling at. I've been working on the landscaping on this side of the house as well. I bought a book for northeast plants and some landscaping ideas and eventually came up with a plan. I am by no means a garden expert, but i knew I didn't want just the same old plants you see every year at the local HD. The book was a big help in finding different plants that would work in our area and designing a layout that would have something in season all through the year. We'll see how it works out!
I found 44 blue stone pavers on craigslist so I could replace the concrete walk at a great price. I've also been rooting some plants I either found or were given to me and the rest either were bought locally or I picked up starter plant/seeds on EBAY. The mulch I get free from the township and the edging stone were free too. I get into more details of what's been planted when everything is finished....


The push to get this done now is because I have all kinds of plants started in pots that need to get rooted good in the ground before the cold comes. Other wise I will have to sink all the pots in the ground and dig them out in the spring.

Friday, July 11, 2008

Moving Towards The Front

I moved up to the front corner and stripped the old siding a little bit ahead of time so I could start flashing and get the starter course in where the porch roof meets the house. This is a tough area because of the corner and the angles of the roof along the wall. I pre-cut 6 foot sections and had them bent to 25 degrees. I learned my lesson on the back trying one long piece and trying to bend without using a brake.


I also don't have the luxury of having a bare roof this time since this roof was done recently....all though laid on top of another roof. This adds to the issues of laying the flashing on the roof. I worked the flashing into the shingles the best I could and will remove the top row and muck them down on top of the flashing. This should look OK and solve any of the leaking problems I've been having.


Next the starter course goes in along the roof line.


I need to finish wrapping, then I can finish the side shingles up to the roof, start the front and side corner a couple rows, and tie everything together when I get to the first uninterrupted row. And let's not forget - make a few more batches of shingles!

Monday, July 7, 2008

Another Eviction

Today I dismantled the soffit along the side and around to the front where it ends and the large 3rd floor dormer begins. In the front section I came across another Grackle village and promptly gave eviction notice!


This is the second Grackle condo now (there's more to come...) and I'm still playing leap frog with the sparrows as I move closer to the porch and they keep rebuilding - but I only have 2 feet to go before I have check mate on them.


This was before the Grackle condo dropped. I didn't even bother after, there was too much clean up to do.....

Thursday, July 3, 2008

Inside - Outside

On to the next section.....


The next section of siding brings me to one of the most difficult - or at least tedious. The bedroom bump out returns to the main house leaving an outside corner and then, 18 inches later, an inside corner. I already have one outside corner under my belt, so that shouldn't be a problem, but the inside will be my first and only.


Demo work complete

Insides are done kind of the same as an outside - you want to "weave" the joints to stagger the seams. I did learn another trick while doing the demo. The old-timers flashed the first couple rows where the siding flare-out occurs. This prevents any water that may get through the siding from collecting behind the bottom crown trim. There's no real shortcut for getting a good edge fit, just trial and error. Starting with a little excess to leave you some room to shape things to size is the biggie.


Starter course installed

Flashing added to starter course


Finish course and second row added - then more flashing


Third row installed - no more flashing needed after this row


Almost done - only two rows left. Next will install starter to middle of window and that should get things sided up to the window.

Wednesday, June 25, 2008

Sill Repairs

The window sills on the house all have been in excellent shape minus the two that were hacked up.... except for one. About 1/2 to 3/4 inch depth seems to be rotted or worn away on the one bedroom window where I'm siding now. My guess is that a window AC unit was in this window for a long time and dripped on the sill, slowly rotting it down. Had this been new growth wood, it probably would be gone! But this old pine is rock solid, dense wood so repairing seemed to be a better option than replacing the entire sill.


After stripping the window trim, I cleaned out any loose wood and dirt. Using Minwax wood epoxy filler I smoothed everything over with about 1/8 inch of epoxy. Then to avoid using several can of filler, I installed some filler pieces of wood. Then two more coats of epoxy to get things up to finish level and blended in to the undamaged surface. Finally some sanding with 60 grit followed by 120 grit and the sill was as good as new.


Next a prime coat and it's ready for a finish coat.


And a shot of the next section finally finished. This section went faster with out any soffit to replace other than just the crown moulding. Now I'll set up scaffold and catch the other outside and inside corners of the bump out. Should add to the learning curve!


Saturday, June 14, 2008

Century Plaque

I finally received the Century Plaque for the house and installed it above the plaque I had made awhile back. The plaques are made available for houses that reach the century mark in Ridley Park. The research submitted with the application is kept in the archives to help document the houses in the area.


In restoration news, I finished the final coats of paint on the back and have set up the scaffold for the first half of the driveway side of the house. I finally have some new inspiration to look at and keep me painting MORE shingles....


And once again the sparrows built a nest under the shingles that I had to remove..... this time no eggs but actual kiddies. Boy they're quick family makers! So I managed to get them into a hanging basket and put a shake on top for sheltering - and so far ma and pa seem to be tending to them in between my time up on the scaffolding.


Feed me!

Tuesday, June 3, 2008

Soffit Solution

Well I was able to find a crown moulding made from a composite PVC that closely resembled the design and size of the original. I was also able to find some tongue/groove bead board also from the same material to reconstruct the soffit. Yes it's not authentic, but this a trouble spot for moisture that I care not to revisit. And unless you get up close and feel it, it looks like the real thing - especially from the ground! I also used a small trim piece to hide the edges of the soffit where it meets the crown and the shingles.


The demo work finished


I installed a 2x3 along the wall and between the rafter tails to have as a nailer for the soffit. I wish the crown was a little less wavy, but the original was too that I removed so that's how it originally was... and there ain't much I can do about it at this point without tearing into the roof. And once again - it look great from the ground!


Crown fascia added and soffit started

Check out the corner too - first one is finished. Not too bad for my first try. I'll have four more to do (yep - there's an extra one). Next is to strip and clean up the window trim. I don't think these windows will be getting replaced till next year. Except for maybe the kitchen one if I can get the upstairs kitchen demoed before winter and return the window to original size. Then it'll be caulking and second coat everything before moving on to the next side of the house.


Friday, May 30, 2008

Weaving Corners

When hanging shingles, the money is in the corners. Quickly I'm finding out that it takes easily twice as long to work a corner than when I'm doing straight runs. The key to a tight corner is "weaving" the corners. Basically one shingle is going to overlap the edge of the adjacent shingle on the second wall. When you continue to the next row you want to overlap the opposite shingle from the previous row so that the seems get staggered as you run up the corner, leaving no continues seem for water to penetrate. It's a little confusing until you see it done.


Here the starter course is run after stripping and a primer coat on the crown detail that flare out the bottom shingles. To get the initial corner you have to mount a shingle on the corner which will flare out at the bottom giving the shingle an arc form. Using a shingle on the opposite wall, you bend that shingle and transfer the curve to the mounted one and cut the curved edge out. Then you can mount the second, and cut the overlapping edge to the curve of the first. Make sense??


Next the first exposed row is installed over the starter course. The corner on this row will have the opposite edges overlap than the shingles underneath. You can see why I had to tear into the next wall since a corner has to be worked from both sides at the same time.

The next rows are installed, each time staggering the overlap on the corner. A story pole is usually used, with marks of all the rows on the old shingles. I've been just referring to the nearby original shingles and transferring my line since I didn't do a complete tear off from the beginning. The pattern also leaves for some fudge factor and fools the eyes of any imperfections in the layout which is a nice crutch!

Here's a close up of the corner. Each bare edge is the overlapping edge. If you look close they alternate between each wall. Another hint for getting this slight curved overlap to look tight is using a small (4 inch) hand plane. You rough cut the shape and then after mounted, run the hand plane. When doing the overlap, the plane will form the edge to the opposite shingle and give a nice tight joint. Sometimes a finish nail is needed too for stubborn shingles that want to spring out.

If you're still confused, here is a great video clip of Tommy (the master!) on TOH doing a corner... seeing is easier than explaining this for sure.

TOH - Repairing Shingle Siding

Saturday, May 24, 2008

$4.07 A Gallon!

That's what i paid last week to top off my oil tank for the heater - and that was at a discount price I get with the Energy Coop I joined in southeast Pa. I figured it will only be worse this fall.

So here's my solution to the escalating oil prices...


When I'm not working on shakes, I'm rounding up and splitting wood. I figure I have about 2 cords at this point. Looks like the chimney and stove are gonna pay for themselves pretty quick the way things are going. My goal is to use only one tank of oil this year - we'll see how it goes.

Mr. Cheney and company ain't gonna get rich at my expense!!

You can also see I managed some time to get the garden in. Hopefully someday when I can landscape I'll get something more elaborate going, but I got the basics in there.

Also note I still need to paint Rach's door and fender! I keep getting reminded every week. I replaced the fender and door skin last year after she had an ice mishap, but..... another item on a longgggg longggg list.

Friday, May 23, 2008

Sad Sad Soffits

I was debating if I should redo the soffits this round of siding work or wait till next year... until I discovered that the cedar shakes extended past the soffit and up into the eves. So began tearing down the aluminum covering the old soffits. Under that was a layer of plywood - slightly rotted - and finally the original tongue and groove boards. Or at least what was left of them. Past roof leaks from the old roof gutter system took a toll on the original wood and roof sheathing repairs can be seen. Of course when the house was enclosed in aluminum, the best solutions was apparently to cover all the sins up.


Anybody home??

So now what to do - have 100 years of collected soffit crap rain down on you of course! And then of course was the first eviction notice of the year - to a family of Grackles in the corner.


Now with the soffit demo done I must come up with a new soffit solution. I would love to use a composite material - but nothing I find is quite right. I could get some 1x3 and router tongue and grooves, but that's more work then I'm willing to put into this project. Right now I'm leaning towards using the pine bead board I've used in other eaves off the first story and run it short ways. This would require adding a nailer on the wall and along the gutter, but should look good (not quite original, but who will know??) and hold up pretty well.

It looks like I will need to remove the gutters too to expose the fascia which originally was a crown moulding trim which is still in place. What condition it's in remains to be seen. To add gutters after the roof system was removed, scrap pieces of wood were nailed onto the crown so the gutters could be fastened to the fascia. I might as well take care of this too while I have access to this hard to reach place. But, I won't have any gutter system for a while.


The cedar hanging is moving along. I've been only removing sections at a time as needed, so I always have an original row to reference my new shakes to that's not to far away. I've been using 15# tar paper underneath, which is a little more durable than the rosin paper originally used. Also I go through all the plank sheathing and add screws to help anchor it down to the studs better. I've found them to be a bit loose at times with the original nails backing out a little.


Next comes the first corner which is where the real challenge in shake hanging comes.....

Tuesday, May 13, 2008

Shingle Math

So figure it takes me about:

1 minute per shingle to primer + 1 coat of paint = 2 minutes per shingle

times

about 1000 shingles per house side x 4 sides = about 4000 shingles

plus

another 1000 for the front dormer

equals

10000 minutes of painting time required for entire house (or 167 hours!)


.... and that doesn't include sorting/resizing, installation, or the second coat of paint required once hung.

No wonder the neighbors think I'm nuts! But they do appreciate the asthetic improvement.


Sunday, April 27, 2008

Here A Shingle, There A Shingle....

I finished up the window seat in the dining room and with the weather breaking, decided to skip the kitchen/bath and move straight to the siding project. I figured now was the best time and hopefully I can get a good jump on the project before the summer heat hits - then I can move back inside to the kitchen for the worst of the hot weather.

So here they are - 12 square of grade A white cedar shingles straight from Minnesota. I lucked out and got a "spring special" price. Now for the fun part...... these all need to be sorted through and pre-primered and painted before I can install them. Doing this first should double the life of the paint since the shingles will be pretty well sealed. Easier said than done though when you're talking thousands of individual shingles to be done.

Shingle painting party anyone??


Last year I brushed painted and hung on a clothes line the shingles I needed for the first story, but that was only a square and still took a good amount of time. I did some poking around on the Internet and found a good solution. Using a 4x8 sheet of 1/2" plywood, I cut slots with a circ saw spaced 1 inch apart. Instead of brushing I will be dipping the shingle and then brushing off the excess paint. Next you insert the thin end of the shingle into the slots which holds it while it's drying. Any paint runs will end up towards the thin end of the shingle which gets covered by the overlapping shingle - so it's pretty full proof. And not to mention I can get a lot of shingles drying in a small area. By the time you fill the board, the first shingle should be ready for the next coat. Here's a pic of trying it out and seems to work really well.

Testing the drying board


Another issue is that the shingles are random width cut. Normally this would not be an issue, but I will be replicating the original staggered pattern on the house. These were all approximately 6 inches wide to give a uniform look. So before I do any painting I need to go through each bundle and sort out the thin ones (used where cut widths are needed), the normal 5-6" shingles, and the wide ones which I have to cut down on the table saw.

Cutting and sorting

Here are a few pics of the house which I've began to remove the aluminum siding to reveal the original shingle siding which will be removed and replicated with the new shingles. Recycling the aluminum will certainly help to offset the cost of the new shingles with the scrap prices being pretty good now. Once I get enough painted, I'll start with the back first since the siding is already partially removed - plus it's a good side of the house to learn on!


Revealing the original staggered shingle siding - it's seen better days